Installer
- Download the package, extract it anywhere you like.
- Right-click the installer and select 'Run as Administrator' in the extracted content.
- Language selection pop-up, select English (or you can try other language, I dunno it work or not).
- Follow on screen instruction and just press next until password section. Note: some password is at the previous step which inside the user-agreement, but some has different password. In this theme there is a different password, therefore please copy below password to use, or visit the author blog for password.
- In 'Select Start Menu Folder' step, if there is a unknown character name in the text field please change it to any word (not important).
- Then just follow the instruction and next until the wait 20sec, this 20sec is to extract the file to ready for the installation (I'm not too sure as well).
- After 20sec, then press close button to start the installer. If you can't find any "close" button, try to press "Enter" to continue, if can't then try "Alt + F4".
- At the last step, please un-check 2nd option and check the first option (just like below image does), then press finish.

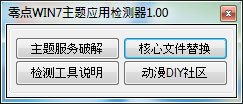
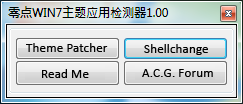
- It will prompt you a new windows which consist of 4 buttons, if direct translate this option call 'Zero Team Windows 7 Theme Detector' (I know it is quite lame, if you have any better translation do let me know ^^). Actually it consist of Shellchange & Themepatcher. Continue next section for details.
- Note: if you see a pop-up something with '....Denied..', mean you did not run it as administrator, so you need to use another way to do it, discuss at 'Windows 7 Theme Detector' step below.
Windows 7 Theme Detector
I have include original and translated buttons screenshot for you guy, please take it as refer.
Version 1.0


Here got 4 buttons. To enter this windows (or this detector), you got 2 option, either follow the 'Installer' step or you can go to the theme folder ("C:\Windows\Resources\Themes\**theme name** \ShellChange"), then right-click the 'Guider.exe' and select 'Run as Administrator'.
Version 2.20 (updated on 12-Feb-2012)
There is two new buttons added from the version 1, but not affect the usage, just be careful not to press wrong button(s).
Theme Patcher Button
If your Windows 7 already using or used some third party theme before, most likely you are already patched so you can skip this button. Or else, please press it to continue, here will not discuss the step, you can go HERE to read the step.
FYI, if your OS did not patch with theme patcher, you will unable to use any of this theme, most likely your window will become basic classic theme if you apply the theme.
Shellchange Button
This 'Shellchange' button is to help you to replace some file which to display the beautiful skin (like the start button, folder background and so on), the file going to replaced are the 'explorer.exe', ExplorerFrame.dll and so on.
- Press the 'Shellchange' button it will prompt you a new Windows.
Again, I will include a original and translate version screenshot.


- Then next, you just require to press the only button (Install button), this program will help you replace those needed file and backup the original file. After that when it is replace successfully, it will prompt you a windows and then it will ask you for restart (my case is automatic restart).
- By now you should see some changes, if the theme come with the 'Start Button' skin, the 'Start Button' now will already been replace by the theme skin.
- After restart, you can go to 'Personalization' to change the installed theme. Can be access via desktop > right-click > Personalize or Start > Control Panel > Appearance and Personalization > Personalization.
- In Personalization, select the installed theme, and you system will change to the theme that you selected. You should able to see folder background, start menu background, and etc.
Read Me button
This button you can ignore, it just a few lines of sentence that describe why you unable to use the theme, which I already explain.
A.C.G. Forum button
Aiks, I miss out the 'DIY' word (A.C.G. DIY Forum). Anyway, not a big deal, this button will lead you to the forum when you press on it. You can visit the forum if you want.
Shell File Checker (version 2.20)
Seriously I'm not sure this is for what use, I will update again when I know what is it.
Theme Resource Link (version 2.20)
A url link to the forum theme resource page.
Restore to Original
After you run the Shellchange, your Windows start button was changed, to restore to the original skin, you just require to do some simple step.
- Go to "C:\Windows\Resources\Themes\**theme name** \ShellChange".
- Right-click the 'Guider.exe' and 'Run as Administrator'.
- Then select 'Shellchange' button, this time it will prompt you a different Windows (a button extra).


- Then, press the 'restore' button.
- It will prompt you something, just press ok, and it will automatic restart your computer, if not, please restart it manually.
- After restart, when you enter your OS, you will see a extra icon on
your desktop. After some version of the guider, this file will not
exist, so just skip this step if you can't see any of this file.

- All you need to do is double-click it (best is to run as 'administrator'). Then it will prompt you a new windows with a button
- Press this button (which mean 'Clean'), to clean the extra file that still inside the folder (I'm not too sure as well).
- Done!
To uninstall the theme, it is rather easy, but Please Do Not Uninstall the theme when you still using the theme or haven't do the restore process (refer to 'Restore to Original'). Please remember to change it back to the original or other theme (access via Personalization), and do the restore process then only do the uninstall.
- To uninstall the theme, go and press the file in the Start Menu > All Programs > **Theme Name** > "Uninstall **Theme Name**".
- Windows pop-up and just follow the instruction.
- Done!


No comments:
Post a Comment