
Recently I saw some of the Windows 7's anime theme floating around the usual place. Some more I think many you have migrate to Windows 7 already right? So from now on, I will "steal" some of the Windows 7's anime theme from usual place and share with you guy as well ^^.

The purpose of this post is to teach you to use the 3rd party anime theme of Windows 7 that I share here, and if later there is any new changes on the installation, I will update here as well. Anyway, please read carefully and follow all the step below, or else the theme might not work properly. I know my English is bad and broken, so please bear with it ;).
This tutorial is only tested on Windows 7 x86(32-bit) system, and I use it on Windows 7 Ultimate version with language pack installed, not sure other version will work or not. This tutorial I use Kusugawa Sasara WINDOWS 7 THEME as example, but other theme more or less is the same so be flexible ;).
Lastly, I will not take any responsible if your Windows 7 crash, data lost or whatsoever after you use the theme, the UXTheme Patcher and this tutorial. So use it at your own risk.
Table of Content
- Installation
- Install the Theme File
- Install the Theme Patch
- Universal Theme Patcher (x86/32-bit)
- Put on the Anime Skin for Windows 7 Theme
- Apply Anime's Theme
- Change Start Button and Background
- Restore Start Button and Background
- Uninstall the Theme
Installation
Install the Theme File
Most likely there will be 2 file share very similar name, like "abc WINDOWS 7 THEME.exe" and "abc WINDOWS 7 THEME Patch.exe". The theme file I refer is the ".exe" file that without the "Patch".
- Extract the compressed file that you have download.
- Right-click on the "Theme File".

- Select “Run as administrator” and then a window will pop up.

- Select “English” in the drop down box and press “Next” to continue.
It will prompt you the Setup Wizard.

- Follow on screen instruction, press “Next” to continue

- Select the “I accept agreement”.
Copy (Ctrl + C) that highlighted url.
Continue with “Next”

- Paste (Ctrl + v) the password into that input box.
Continue by pressing “Next” button.

- In this section, you can leave it default (but if it has a weird
character, please change to English or your preference language).
Continue by pressing “Next” button.

- Continue press the "Next" button until you see above picture, continue by pressing the "Install" button.

- For now please wait for 20 seconds.

- After 20 seconds, then press the "Close" button.

- Installation will start now so wait it finish.
OK now the next step is very important, please read carefully.

- Now got 2 situation, follow the one that apply to you.
- Situation 1
- If you haven’t run the “ThemePatcher” or not sure, please check the 1st box.
- Leave 2nd box uncheck
- After that select “Finish” button.
- Continue to the step of “Universal Theme Patcher-x86”.
- Situation 2
- If you already run the “ThemePatcher”, please dot not check the 1st box
- Leave 2nd box uncheck
- After that select “Finish” button.
- Continue to the step of “Install the Theme Patch”.
- Situation 1


After you install the file, you can check under the “Personalization” windows, and there is a new installed theme which will display like below picture

The installed theme show you a black image background like above picture, so what you need to do is to install the “Theme Patch”. If after you install the file and it show you a beautiful background, then you can skip this step unless I have mention. So far, the few Windows 7 theme I found are require to install the patch, I’m not sure what problem, maybe is the path problem, but no worry it is rather easy.
- Start the installation by select the filename of the file that end with “Patch”.

- From here follow the on screen instruction, very similar to "Theme File" installation.
Some patch is requires password and some don’t.
If require password, please copy it in the user agreement.
- After installation is done, please remember to uncheck both checkbox before select the “Finish” button(refer to above picture).
- Go to Control Panel > Appearance and personalization > Personalization (or right-click desktop > Personalize).
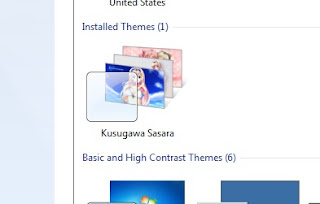
- Now the "Installed Themes" should be look this this in Personalization window.
- Continue the step of “Put on the Anime Skin for Windows 7”.

Universal Theme Patcher (x86/32-bit)
This is similar to the UXTheme patcher of Windows XP, just that this is more thing and more advanced. Remember you just has to do it ONCE.
- It will prompt you below Dialog after you finish the setup wizard in installation step if you follow the "Situation 1".

- Just select your desire language and press “Ok” button.

- Just read through in case you want to understand more.
Press “Yes” button to continue.
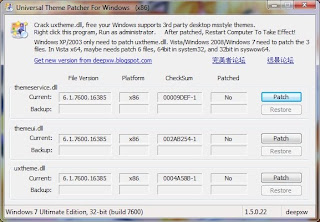
- Here will show you what file need to be patch.
In my case, I patch all of them.

- After you patch all of the file, it will prompt you a window to ask you to restart computer.
Just select “Yes” button and your computer should automatic restart, if it doesn’t, please restart it manually. - After restart, then continue the step of “Install the Theme Patch”.
If you already do so, go to Anime Skin for Windows 7.


Put on the Anime Skin for Windows 7
Apply Anime's Theme
After you install the theme and also the theme patch, now you able to see this inside the "Personalization" window.

- Go to Control Panel > Appearance and personalization > Personalization (or right-click desktop > Personalize).
- Select the Kusugawa Sasara theme under the "Installed Themes" section.
- Now your Windows 7 will become like this, beautiful.

- Although it working since "start menu" background has change, but actually it still got more.
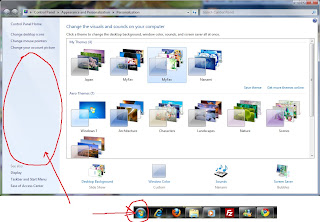
- Some of the theme is able to change the "Start" button and also personalization side column background.
For example the theme I use in this tutorial, Sasara Windows 7 Theme. - If you want to use the Sasara "Start" button and Personalization background then continue "Start Button and Background" step.

Change Start Button and Background
Not all the 3rd party anime Windows 7 theme come with the beautiful start button, therefore please see the screenshot that I repost, if the screenshot show Windows 7 default button mean you can ignore this step. This guide will not able to continue if you are using SP1 and some of the theme, please go to Patch for Windows 7 SP1 Theme to update the shellchange and some necessary and theme continue to this Merry X'mas Everyone, because some step has no longer the same as previous and control by a single file call 'Guider.exe', but actually this step still can use. Please note some of the theme (especially some of the theme that before the Merry X'mas Everyone post) is unable to use even you using the way I mention in the Patch for Windows 7 SP1 Theme.

This step is very very important, please read carefully, or else somewhere might not work properly. You can still use the theme, but only the area that red arrow pointed above will not have any effect. So let's start.
- First go to Start > All Programs > “Kusugawa Sasara WINDOWS 7 THEME”.

- Right-click on the file that has the “BETA” name in it, select the “Open file location”.
- After that, a window pop up and the folder should have these 4 files.

- If the red circle file (above picture) is missing in this step, mean you have to reinstall.
- Next right-click the file that name “ShellChange”.

- Select “Run as administrator” (above picture), then it will prompt you another window.

- Select the “Install” button as shown in above picture.

- Then it will prompt you another window which tell you to restart
your computer to take effect, but it is in Chinese or weird character.
(above picture)
- If this window shows you something “Access to the path is denied…”, then it is failed. This happen because you did not “Run as administrator”.
- Re-run the file with administrator right again, but I'm not sure it still working or not because one of the file is missing now.
- If still no effect, go to "Restore Start Button..." then restart this step again.
- Press “Ok” button, the picture that mention in 6th step will updated
another “restore” button, nothing much for now just close it.(above
picture)

- By now your start button is already updated(above picture).
So what you need to do is restart your computer. - After restart your computer, by now your personalization window will look like this.

- Congratulation, it is done!
- But what if I want to change it back to default start button, how?
Continue "Restore the Start Button" step for more info.


Restore Start Button and Background
If you want to restore back the start button and the Personalization background picture back to Windows 7 default, you need to do following step, very similar to the previous step. You can ignore this step if you did not apply the "Change Start Button and Background".
- Go to Start > All Programs > “Kusugawa Sasara WINDOWS 7 THEME”.
- Right-click on the file that has the “BETA” name in it, select the “Open file location”.
- After that, a window will popup and the folder should has these 3 files.

- Next right-click the file that name “ShellChange”.
- Select “Run as administrator”, then it will prompt you another window.
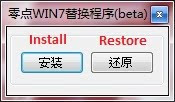
- Then select the “Restore” button.
- Another window pop up to tell you restore successfully and ask you to restart your computer to take effect.

- At the same time it will create a file at the desktop. For now, just restart your computer first.
- After restarting you system, right-click the created file that mention previously. (refer to below picture)

- Select "Run as administrator" and it will prompt you a window.

- This function is to clean certain file/folder, just press the button and wait for a while.
- Then another window pop up to inform you it has remove the files, then press ok.
- You can delete this file and all done.


Uninstall the Theme
If you want to uninstall the anime Windows 7 theme, please be sure that you have already done this step (“Restore the Start button...”). Then continue below to learn how to uninstall the theme.
- First, change back to other theme first before you want to uninstall.
- You can go to Personalization and change it back to any default or your other favorite theme.
- Go to Start > All Programs > “Kusugawa Sasara WINDOWS 7 THEME”.
- Select the “Uninstalled Kusugawa Sasara WINDOWS 7 THEME”.
If it has two folder, in “Kusugawa Sasara WINDOWS 7 THEME” case, remove the one that end with name of “Path” first, then only remove the original one. - Then follow on screen instruction.
- Done!
Here you can download more anime themes for windows 10 https://themes10.win/anime/
ReplyDelete